How to Transform your Patio Slabs with a Stencil
We show you how Liz transformed her patio.

This patio makeover belongs to Liz, her partner and their dog Ted - All Photos are credited to Liz - Instagram - @home_at_no36_
STEP 1 - MEASURE YOUR PATIO SLABS & CHOOSE YOUR STENCIL DESIGN
To start with measure your patio slabs so that you buy the correct sized tile stencil. See our guide to help you with this.

Liz's patio slabs measured 45cm x 45cm. She had a choice of either:
- Getting a custom sized tile stencil from us that was made to fit her 45cm x 45cm patio slabs. (Just order the next size up and let us know - We will cut the stencil design to fit)
- Buying our standard 16 inch (40.64cm) Tile stencil. The stencil design would be slightly smaller than her actual patio slabs.
Liz decided to buy our standard 16 inch (40.64cm) tile stencil. This option meant that the stencil design would be about 2.5cm away from the edge of the patio slabs. Both options look great, its just your personal choice.
Liz used the Kingscote Tile Stencil.

We have loads of designs for you to choose from. See our full Tile Stencil Collection here. All suitable for use with any type of paint for both indoor and outdoor use.

STEP 2 - CLEAN THE PATIO SLABS
This is the most important part of the project. A good clean surface is key. If your surface isn't clean and debris free then the paint may not adhere properly causing it to flake off over time.

TOP TIP: Your surface needs to be clean to get the best results.
Sorry, but you need to clear the area and clean your surface. Ideally use a jet washer to clean off any dirt, algae, mold or moss, but if you don't have one then it just requires a bit of hard graft to clean your slabs. Scrubbing them with washing up liquid or a diluted bleach to get them clean.
STEP 3 - BASE COAT
Once your surface is all clean and dry then its time to apply the base coat. Liz used Sandtex ultra smooth masonry paint for the base coat. This product is available in a range of colours. Liz used Plymouth Grey.

TOP TIP: Masonry paint should not be applied to surfaces when the ambient temperature is below 5 degrees or higher than 25 degrees. Also the painted surface should be protected from rain for a minimum of 48 hours so its important to keep an eye on the weather before you start your project. Some paints may differ so always double check the paint label before you start.

Liz applied two coats of the base coat using a paint roller. Waiting at least 6 hours or more in between each coat. Once it's dry it's time to get to the fun bit!

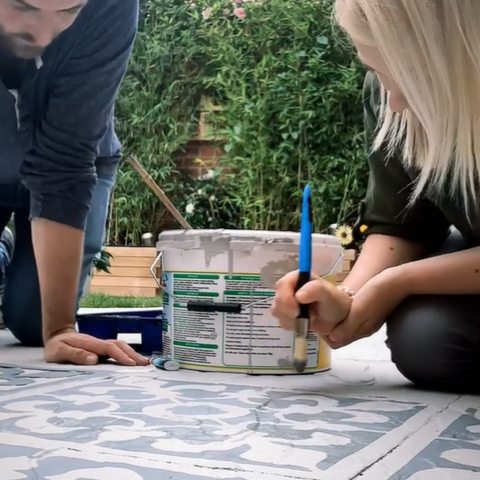
STEP 4 - STENCIL
It's finally time for the stenciling. Its a good idea to fix / hold your stencil in place whilst you paint, you could use frog tape, masking tape or something small and heavy to hold the corners down, such as small tins of paints for example.

To create the colour for the stenciling Liz mixed Plymouth Grey masonry paint with some Black masonry paint to create the perfect shade of grey that she wanted.

It's quicker to use a paint roller to apply the paint through the stencil. Always remember to wipe off the excess paint before you apply it to the stencil, as excess paint can cause bleeding underneath the stencil.

TOP TIP: A soft cushion or a blanket to kneel on might help your knees!

It just needed a bit of touching up to make it perfect.
STEP 5 - SEALER
Once the stenciling was complete it was left to dry and then finished off with a sealer, just to give it added protection.

Liz used No Nonsense Path, Patio and Driveway Sealer, applied with a roller.

So what do you think? Quite a transformation isn't it? Such a budget money saving makeover, just using a stencil and some paint!
 |
 |
 |
 |
Here are some more patio transformations to inspire your next project.
 |
 |
 |
 |
 |
 |
 |
 |
So what do you think? Are you inspired to take on your own project?
